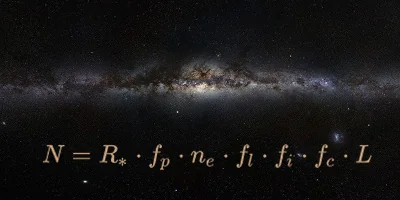
How many technological civilizations exist in the Milky Way? What the origin of life on Earth tell us about the parameters of the Drake equation.
Stellarium [1] is an open source astronomy software for rendering the night sky. It has a powerfull built-in automation interface based on JavaScript (QtScript). This interface allows setting up and controlling almost all of it's parameters. As powerfull as the interface is, it does not allow you to create videos directly. To achieve this an additional layer on top of Stellarium is required. This additional layer comes in the shape of a python script called "Stellarium-To-Video" (formerly named kalstar).
Sample of a video created via Stellariums remote API.The script was tested on Linux and Windows 11 but it should also work on other Unix-like operating system.
This script requires additional software to work! Before you start you need the following software installed:
| Application | Description | Download Link |
|---|---|---|
| Python 3 | Python is a programming language that is required to run the script. It should run on any Version greater than 3.10. | python.org |
| Stellarium | Stellarium is the software that will create the frames for the video. | stellarium.org |
| ffmpeg | ffmpeg is a command line tool that can create videos from a sequence of images. In fact it can do much more than that but for this script it is used to create the video. It must be installed and the ffmpeg binary must be in the search path. | ffmpeg.org |
| VLC | VLC is a media player that can be used to play the video once it is created. It must be installed and the VLC binary must be in the search path. | videolan.org |
It does not matter were you install the software but make sure that the location of the stellarium, vlc and ffmpeg binaries are in your path variable. On Linux systems that should be the case by default but on Windows you might have to add the paths manually to the PATH variable. This script will not work if the binaries are not in the path! Please note that this script cannot be run in a python notebook like Google Colab or Jupyter notebooks. It must be executed from the command line. To do so first create a directory and clone the stellarium-to-video project from GitHub.
First download the script from GitHub and install the required Python packages.
git clone https://github.com/beltoforion/stellarium-to-video.gitInstead of using git you can also manually download the script archive by clicking the green "<> Code" button on this page. Then change into the script folder and install the required python packages by executing pythons package manager pip.
cd stellarium-to-video
pip install -r requirements.txt
You can test it out with this command which will simulate the first two hours after sunset in Boston:
python3 stellarium-to-video.py -l BostonThe program behaviour can be controlled with the following command line options.
| Parameter | Parameter Type | Description |
|---|---|---|
| -c (optional) | string | The caption of the video. The video title will be superimposed onto the video. If this parameter is omitted a default caption will be used. |
| -d (optional) | ISO 8601 Date and Time | The simulation date as ISO 8601 string (i.e. 2024-02-20T16:37:05). If the time portion is omitted and the selected base planet is Earth the script will automatically start at sunset of the location given with the -l option. If this parameter is omitted the simulation will start at the sunset time of the current day. |
| -dt (optional) | ISO 8601 Duration | The time difference between two sucessive frames as a string representing an ISO 8601 duration (i.e. PT20S for 20 seconds). |
| -fps (optional) | int | Frame rate of the output video. |
| -l | float, float string |
Location of the observer. This is either a string containing longitude and latitude as a comma separated list or the name of a city. If a city
name is given the script will automatically try to find the proper coordinates for it.
Examples: -l Berlin, -l 52.5186,13.4083 |
| -o (optional) | string | The name of the output video file. |
| -p (optional) | string |
The planet on which the simulation shall take place. ('Earth', 'Mars', 'Venus', 'Mercury', ...) If this parameter is omitted the simulation
will be assuming Earth as its celestial home.
Examples: -p Mercury |
| -s (optional) | - | When this flag is specified an instance of VLC will be started once the video is created. VLC must be installed and the VLC binary must be in the search path. |
| -sz (optional) | string | The size of the output video. Must have the format WIDTHxHEIGHT (i.e. 1920x1080) |
| -t (optional) | string | The stellarium script template. This is a ssc file with placeholders that must be located in the scripts folder. It contains placeholders that will be replaced with the parameters of the python script to define the time and location of the simulation. You can create different script templates to customize the look of the animation. If this parameter is omitted the script will use a default template. |
| -ts (optional) | ISO 8601 Duration | The simulation time span as an ISO 8601 Duration string (i.e. PT2H for 2 hours). If this parameter is omitted the duration is set to 2 hours. |
| -v (optional) | float,float,float | A comma separated list of three floating point values definine the direction of view. The values represent azimut, altitude and field of view. |
This command will compute the first 2 hours of night sky in Berlin (Germany) on the 25th September of the year 2024 in one minute intervalls.
python3 stellarium-to-video.py \
  -l Berlin -c "The Sky over Berlin"\
-v 90,25,70 -d 2024-09-25 -ts PT2H -s -o berlin-sky.mp4 -dt PT1MIn the next example, we will calculate a video of an analemma. An analemma is a curve that represents the changing position of the sun in the sky over the course of a year. For this animation, we explicitly set the script template to suntrack.ssc. This is a template that marks the position of the sun with a red circle in each frame.
python3 stellarium-to-video.py\
   -l Freiberg -t suntrack.ssc -c Analemma -d2024-06-20T12:00:00+01:00\
-ts P1Y -s -o output.mp4 -dt P2DThe final example calculates a double sunrise on Mercury. Due to its proximity to the Sun and the strong tidal forces acting on the planet, Mercury is locked in a so-called spin-orbit resonance. This means that it rotates exactly three times for every two orbits around the Sun. This can result in a double sunrise. In this example, the -p parameter was used to change the location of the observer to another planet.
python3 stellarium-to-video.py\
   -l-90,0 -c "Double Sunrise on Mercury" -v90,10,45 -d2019-05-16T12:00:00\
-ts P24D -s -o "mercury.mp4" -dt PT2H -p "Mercury" -sz 960x540stellarium-to-video.py will create a script for the Stellarium scripting engine. It will then start Stellarium and execute this script in order to create the animation frames. Once Stellarium is finished the script will use ffmpeg to create a movie out of the frames.
Script templates are a Stellarium script file with placeholders for parameters controlled by stellarium-to-video.py. At runtime the placeholders are replaced by the Python script. The template defines the landscape and how stars, galaxies and planets are rendered. You can create custom templates to completely customise the look of the video. Your script templates must be located in the scripts folder and can be specified with the '-t' command line parameter when running this script.
// Author: Ingo Berg
// Version: 1.1
// Name: Stellarium-To-Video
// Description: A Script for creating Frames for Stellarium Videos

param_frame_folder = "$FRAME_FOLDER$"
param_az = $AZ$
param_alt = $ALT$
param_lat = $LAT$
param_long = $LONG$
param_title = "$TITLE$"
param_date = "$DATE$"
param_timespan = $TIMESPAN$
param_fov = $FOV$
param_dt=$DELTAT$

function makeVideo(date, file_prefix, caption, hours, long, lat, alt, azi)
{
    core.setDate(date, "utc");
    core.setObserverLocation(long, lat, 425, 1, "Freiberg", "Earth");
    core.wait(0.5);

    core.moveToAltAzi(alt, azi)
    core.wait(0.5);

    label = LabelMgr.labelScreen(caption, 70, 40, false, 40, "#aa0000");
    LabelMgr.setLabelShow(label, true);

    labelTime = LabelMgr.labelScreen("", 70, 90, false, 25, "#aa0000");
    LabelMgr.setLabelShow(labelTime, true);

    core.wait(0.5);

    max_sec = hours * 60 * 60
    for (var sec = 0; sec < max_sec; sec += param_dt) {
        core.setDate('+' + param_dt + ' seconds');
        LabelMgr.setLabelText(labelTime, core.getDate(""));
        core.wait(0.1);
        core.screenshot(file_prefix);
    }

    LabelMgr.deleteAllLabels();
}

core.setTimeRate(0);
core.setGuiVisible(false);

MilkyWay.setFlagShow(true);
MilkyWay.setIntensity(4);

SolarSystem.setFlagPlanets(true);
SolarSystem.setMoonScale(6);
SolarSystem.setFlagMoonScale(true);
SolarSystem.setFontSize(25);

StelSkyDrawer.setAbsoluteStarScale(1.5);
StelSkyDrawer.setRelativeStarScale(1.65);

StarMgr.setFontSize(20);
StarMgr.setLabelsAmount(3);

ConstellationMgr.setFlagLines(true);
ConstellationMgr.setFlagLabels(true);
ConstellationMgr.setArtIntensity(0.1);
ConstellationMgr.setFlagArt(true);
ConstellationMgr.setFlagBoundaries(false);
ConstellationMgr.setConstellationLineThickness(3);
ConstellationMgr.setFontSize(18);

//LandscapeMgr.setCurrentLandscapeName("Hurricane Ridge");
LandscapeMgr.setFlagAtmosphere(true);

StelMovementMgr.zoomTo(param_fov, 0);
core.wait(0.5);

makeVideo(param_date, "frame_", param_title, param_timespan, param_long, param_lat, param_alt, param_az)
core.screenshot("final", invert=false, dir=param_frame_folder, overwrite=true);
core.setGuiVisible(true);
core.quitStellarium();
The behaviour is controlled by the parameters at the top of the script:
| Parameter | Description |
|---|---|
param_lat |
The latitude of the observation location |
param_long |
The longitude of the observation location |
param_title |
The title of the animation |
param_date |
The day and time of the simulation. Must be in the format: "2018-09-25T18:02:22" |
param_timespan |
The total time span of the simulation in hours |
param_fov |
The field of view in degrees |
param_dt |
Simulated time difference between two successive frames in seconds |
The computation of sunset times in my code is done with Skyfield. This code would not have possible without the amazing work of the Team behind the "Stellarium Astronomy Software" as well as the people behind ffmpeg and VLC.
How many technological civilizations exist in the Milky Way? What the origin of life on Earth tell us about the parameters of the Drake equation.
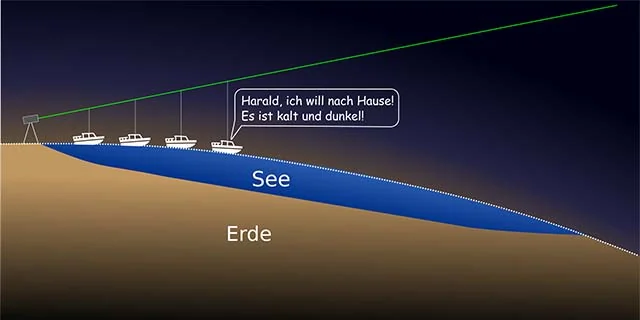
How "Terra-X" a documentary format by german public service broadcaster ZDF failed at flat earth debunking.
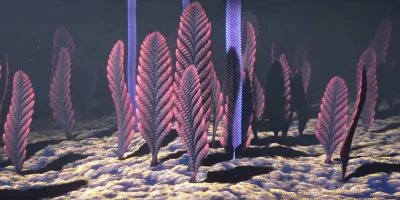
Visit the miraculous world of pre cambrian life forms. The Ediacara biota is a group of mostly soft-bodied organisms that lived during the Ediacaran period 635-538 million years ago.